

We have noticed a boom in the use of the term Web3 in tech communities and articles. I took a course on buildspace, an introduction to Solidity programming. During the course, I built my first dApp, a WavePortal. A Waveportal is simply a dApp for sending waves to me over the blockchain. It worked very well and I wanted more. Personally, a project isn't complete without adding my twist to it. If I made a cat pictures search engine, I'd tweak it to return dog pictures. If it is a chat application, I'd make it support voice chat. Unfortunately, I couldn't tweak the WavePortal that much. I resorted to creating a new project entirely the same libraries used in the course, Hardhat and React. What project do I want to do? I made a list of them.
A wallet address look-up dApp: I assign a short "address" to a user's address and return it when read. That way, if I search for
@taiwo, it returns my real address. It can be used in form of an API by other smart contracts too.A blockchain-based email system.
A router. I had to change the contract address in the front-end several times. I want to make something that will allow that address to be fixed and will route any transaction to that fixed address. There will be a dynamic address and a fixed one.
They were cool projects but I could only do one of the three at a time. So, I picked the first one. Here is a "lengthy-short article" about how it went.
Before we get started, here is a gif of the final product.

You can find the completed application at web3addressbook.netlify.app.
Background
Wallet addresses are the identification tags in the web3 world. A phone number is to a network provider, an account number to a bank as an address is to the blockchain. The wallet address is usually long and non-human friendly. I wanted to build an address book that will allow me to assign unique aliases to a wallet address. That way, one can safely query the system with the alias before making transactions. You can make transactions with the aliases themselves without fear of sending cryptocurrency to the wrong person. This is the main reason why I began building the web3 address book.
Architecture
In a conventional web2 setting, one would expect such a system to have a backend and a front-end. This isn't too far from how it is in the web3 world with the smart contract deployed to the blockchain serving as the backend and a front-end. Mostly, ReactJS/VueJS is used for the front-end but any framework will do. The smart contract is written in Solidity. Hardhat made setting up an Ethereum development environment very easy and using ReactJS for the front-end allowed for access to the immense number of node libraries. I had two different folders housing the front-end and the back-end. That's all there is to the architecture.
Creating the Smart Contract.
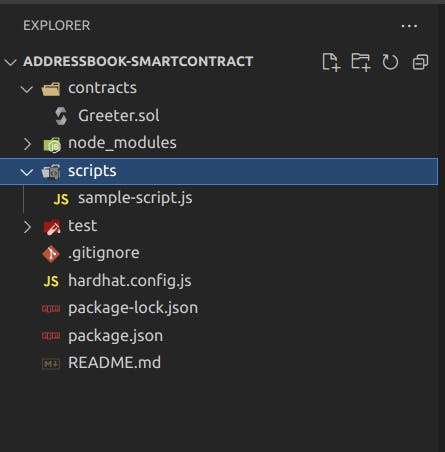
This began with the creation of an Ethereum development environment. Inside a folder called AddressBook-SmartContract, I initialized a new HardHat project by running npx hardhat. I selected the default options during the initialization and allowed the command to run its course. After this, I had a brand new environment setup. Time to get to work. Opening the file with vscode, the directories look as shown below. The contracts folder contains the smart contract code written in solidity. So far, it contains a simple one to get started with. The script folder contains scripts that can be run to perform various one-off tasks like deployment and testing. The test folder contains, well, tests.
I created a new file named AddressBook.sol in the contracts folder. This will contain the code for our address book smart contract.
The plan starting with the smart contract is quite straightforward. We need some kind of look-up table that maps an address to a string. We need it to be a one to one mapping. From a JavaScript perspective, that sounded like an easy thing to do. I would simply find a way to index, say, an array-like data structure by the alias and find the index of the address when I need to. Unfortunately, it isn't that easy to do in Solidity. I had to keep two mappings. One maps the address to string and the other maps string to address. I had to enforce strict measures concerning mutation and updates to ensure that the indexes don't get messed up. Below is the code, let's dig right into it.
//SPDX-License-Identifier: Unlicense
pragma solidity ^0.8.0;

import "hardhat/console.sol";

contract AddressBook {
    mapping(address => string) public addressToAlias;
    mapping(string => address) public aliasToAddress;

    constructor() payable {
        console.log("We have been constructed!");
    }

    function addAlias(string memory _alias) public {

        require(aliasToAddress[_alias] == address(0), "Alias Taken");
        delete aliasToAddress[addressToAlias[msg.sender]];
        addressToAlias[msg.sender] = _alias;
        aliasToAddress[_alias] = msg.sender;
    }

    function getMyAlias() public view returns (string memory) {
        return addressToAlias[msg.sender];
    }

    function getAlias(address _addr1) public view returns (string memory) {
        return addressToAlias[_addr1];
    }

    function getAddress(string memory _alias) public view returns (address) {
        return aliasToAddress[_alias];
    }

    function deleteEntry() public {
        require(
            bytes(addressToAlias[msg.sender]).length != 0,
            "No Alias Existing"
        );
        delete aliasToAddress[addressToAlias[msg.sender]];
        delete addressToAlias[msg.sender];
    }

    function deposit(string memory _alias) public payable {
        require(aliasToAddress[_alias] != address(0), "Alias Not On Record!");
        require(msg.value > 0, "Cant Send Zero Eth!");
        (bool success, ) = (aliasToAddress[_alias]).call{value: msg.value}("");
        require(success, "Failed to withdraw money from contract.");
    }
}
I am going to add a carbon.sh generated image because I used the line numbers to explain some part of the code.
We start by stating the license of the document followed by the declaration of the solidity source file compiler version we would like to use. Line 2 simply means, use a solidity source file compiler greater than version 0.8.0. Next, we import "hardhat/console.sol" allowing us to print strings to the console like a JavaScript program. This is one of the advantages of using hardhat. It comes with a lot of prewritten functions that make life easy for a developer during Web3 development. I have no idea how the console.log works, but I don't have a problem with that.
Line 6 shows what the syntax for creating a smart contract looks like. It is very similar to a class with its many functions. The initialisation of variables addressToAlias and aliasToAddress as a mapping follows. Notice that addressToAlias maps an address to a string and aliasToAddress does the opposite. This allows for very easy indexing of either alias or address. The constructor function isn't an elaborate one. It contains the tag payable to make the smart contract accept ether. This is important for a smart contract that wants to serve as a gateway between two wallets. The constructor prints to the console We have been constructed.
Adding an alias
When one wants to add an alias to an address, it is important to check if the new alias is available and not already taken. That is exactly what the function addAlias, spanning from line 14 to 20, does. The function takes a string as an argument and is accessible publicly. Line 16 uses the require method to ensure that aliasToAddress (_alias) is equal to an empty address (written as address (0)). If the value at the _alias index isn't address(0), the program returns an error with message Alias taken. Knowing that the alias is free, we have to delete the user's existing alias from the aliasToAddress mapping as shown in line 17 after which we do the assignments as done in lines 18 and 19. The user is usually the one that invokes the functions of a smart contract and his/her address would be found in msg.sender.
In case the previous paragraph got a little confusing, remember that addressToAlias(msg.sender) returns the alias of the user. We then delete that alias from the aliasToAddress mapping. That is exactly what line 17 does. Notice that the code doesn't use many temporary variables. This is because of the gas implications of doing that. The more memory and computational resources your code requires, the more you pay for a node to execute it.
Fetching the user's alias
When a user gets to the dApp webpage, one would need to fetch the user's alias. This is what the function getMyAlias does. It is public, stateless and returns an address (written as memory). The implementation is also very simple. Simply return the alias found at the index, sender's address (msg.sender).
The getAlias function does the same thing but takes in an argument. Therefore, one can search for the alias for a particular address using the function getAlias with the argument being the sender's address.
Fetching a user’s address from the alias
Since the application serves as a layer of abstraction for the blockchain in general, there is a need to get the address of a particular user before continuing with the intended transaction. This is also a publicly available function that doesn’t require gas to read. The implementation is simple too. We index the aliasToAddress mapping by the address and return the result.
Delete a User’s alias
This helps to delete an alias-address pair from the address book. It is a public function and requires gas to execute. The implementation starts with checking if the user has an alias registered in the book. Of course, you shouldn’t be able to delete anything but your alias. If the user has no alias, the function returns No Alias Existing. Notice that we index the addressToAlias mapping to fetch the alias of the user. Hence, the function requires no argument. If the alias exists, we delete the alias and then the address from their respective mappings.
Sending Ether with the alias.
This is a function for sending ether to a particular person on the address book using only their alias. We need to first get the address of the person we are sending the ETH to. We start by checking the address mapping for the alias in aliasToAddress. If it is a null address (address(0)), we return the error message Alias Not On Record!. We also check if the value of ether to be sent is greater than 0 as shown in line 45. When these two conditions are fulfilled, we proceed to send the ether to the recipient. We get the recipient address from aliasToAddress[_alias] and invoke the method call with the value of the ether to be sent as a parameter. Finally, we check if the transaction is successful as done in line 47.
We are ready to rock and roll.
Testing the Smart contract.
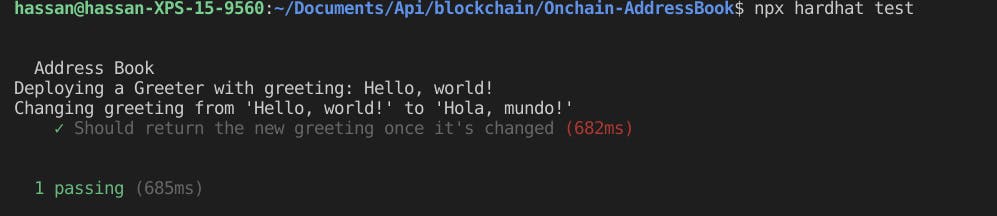
Writing the contract is one thing, testing and making sure it works is another. A Hardhat project comes with Chai and Mocha installed. It even comes with a sample-test.js which can be run with npx hardhat test. The result of running the default is as shown below.
The plan for testing is straightforward. Before running any test, we deploy the smart contract then proceed to test several features of the contract. test.js is created in the \test folder. Its content is as follows.
const { expect } = require("chai");
const { ethers } = require("hardhat");

describe("Address Book", async () => {
  let addressContract;
  let randomPerson;

  before(async () => {
    let signers = await ethers.getSigners();
    randomPerson = signers[1];

    const addressContractFactory = await ethers.getContractFactory('AddressBook');
    addressContract = await addressContractFactory.deploy({});
    await addressContract.deployed();
    console.log('Contract address:', addressContract.address);
  });


  it("Should add a new alias to owner's address", async () => {

    let addTxn = await addressContract.addAlias('@teezzan');
    await addTxn.wait();

    expect(await addressContract.getMyAlias()).to.equal("@teezzan");
  });

  it("Should add a new alias to a randomPerson's address", async () => {

    let addTxn = await addressContract.connect(randomPerson).addAlias('@JayP');
    await addTxn.wait();

    expect(await addressContract.getAlias(randomPerson.address)).to.equal("@JayP");
  });

  it("Should change the alias of randomPerson's address", async () => {
    let addTxn = await addressContract.connect(randomPerson).addAlias('@JP');
    await addTxn.wait();

    expect(await addressContract.getAlias(randomPerson.address)).to.equal("@JP");
  });

  it("Should fetch randomPerson's address by its Alias", async () => {
    expect(await addressContract.getAddress('@JP')).to.equal(randomPerson.address);
  });

  it("Should send ETH to @JP", async () => {

    let old_balance = await randomPerson.getBalance()

    let depositTxn = await addressContract.deposit("@JP", {
      value: ethers.utils.parseEther("2.1"),
    });
    await depositTxn.wait();

    let new_balance = await randomPerson.getBalance()

    expect(parseInt(new_balance.toString())).to.greaterThan(parseInt(old_balance.toString()));
  });

});
The test begins with importing the necessary libraries. expect for the assertion of value comparison and ethers for interfacing with the smart contract. In the describe function, two global variables addressContract and randomPerson are initiated for use in all the tests. Inside the before hook, the contract is deployed and a random address is assigned to randomPerson. Notice that in
const addressContractFactory = await ethers.getContractFactory('AddressBook');
the name AddressBook is used instead of the full path of the smart contract to the main folder. There is not much to explain at this point since the tests are pretty similar. The majority of the tests begins by calling a certain function of the smart contract. Given the test below.
  it("Should add a new alias to owner's address", async () => {

    let addTxn = await addressContract.addAlias('@teezzan');
    await addTxn.wait();

    expect(await addressContract.getMyAlias()).to.equal("@teezzan");
  });
The addAlias function of the smart contract is called with the parameter @teezzan after which we wait for the block to be mined i.e make the transaction run in the blockchain. Finally, the getMyAlias function is called to confirm that it is equal to @teezzan.
The only test that might require a little bit of explanation is the "Should send ETH to @JP" test shown below.
it("Should send ETH to @JP", async () => {

    let old_balance = await randomPerson.getBalance()

    let depositTxn = await addressContract.deposit("@JP", {
      value: ethers.utils.parseEther("2.1"),
    });
    await depositTxn.wait();

    let new_balance = await randomPerson.getBalance()

    expect(parseInt(new_balance.toString())).to.greaterThan(parseInt(old_balance.toString()));
  });
The test begins with fetching the current ETH balance of randomPerson(@JP). The deposit function of the smart contract is called with the recipient alias(@JP) and the value of ether to be sent. In this case, it is 2.1 ETH. After waiting for the block to be mined, we get the new balance of randomPerson and compare their values.
After running npx hardhat test, the result is as shown below.
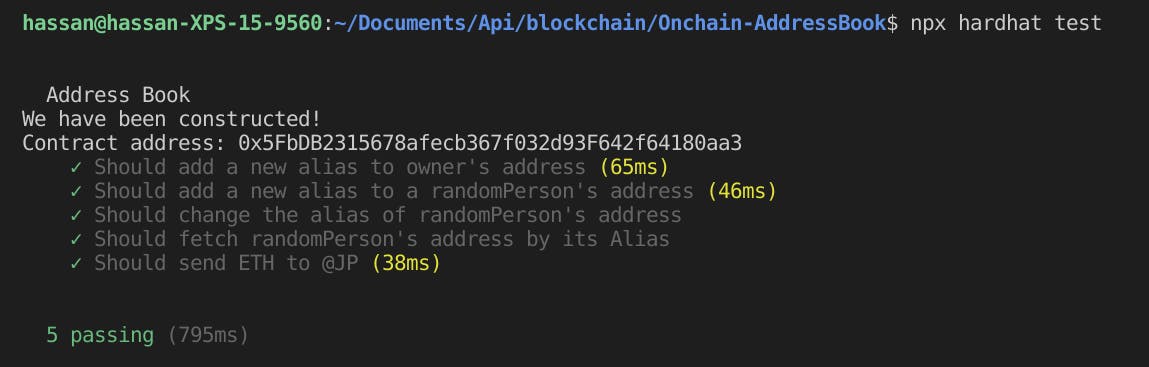
Our tests have been passed. Awesome!
Conclusion
So far, our contract has been deployed on our local blockchain. We need it to be somewhere accessible for everyone. This we will do in the next part of this article. However, I will attach a video of the complete project here.
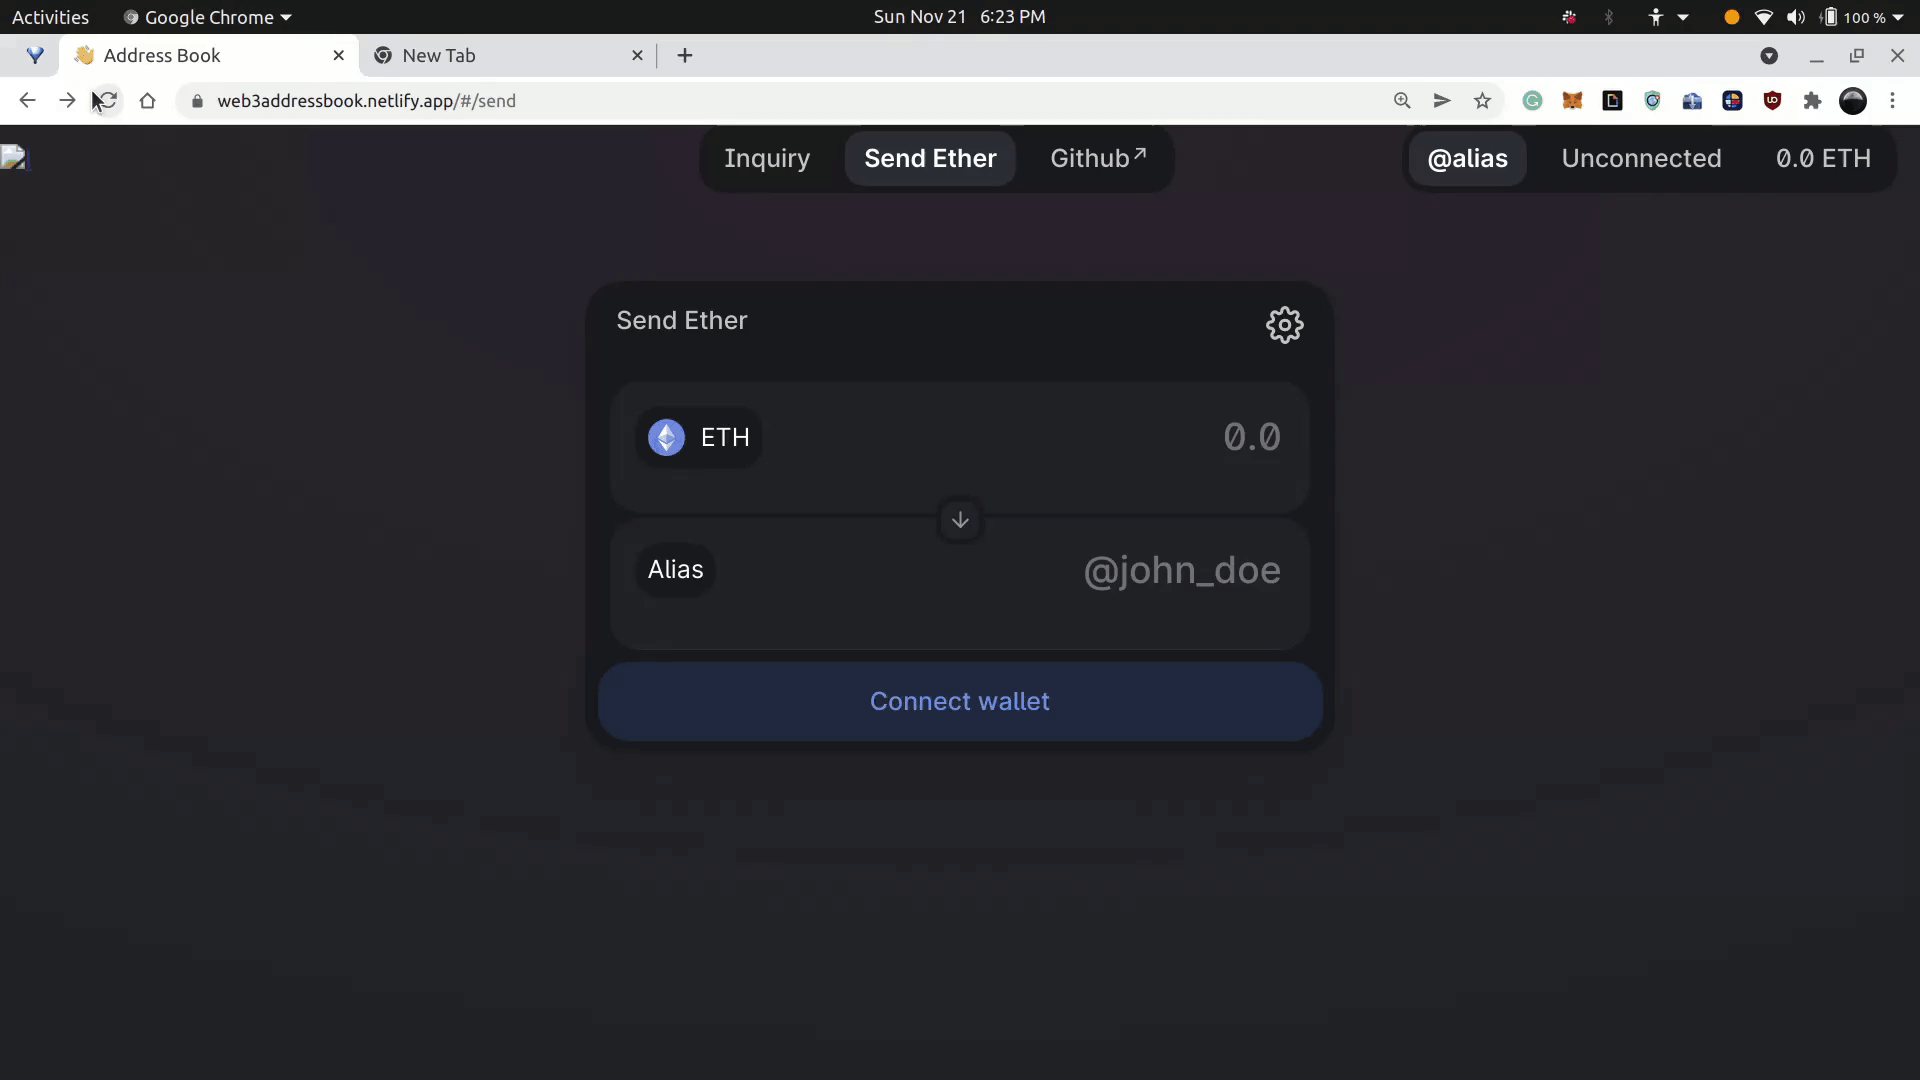
You can find the completed application at web3addressbook.netlify.app. Use the Rinkeby testnet and have fun checking it out. Thank you.